Experimenting Using Iron!
Posted on
I've not used iron to make jewellery before but Goldies have just brought out a new line of iron powders to compliment their copper and bronze range. I was intrigued by the one called "Cherry Iron" so decided to buy some.
The first thing I should say is that Goldie clay is wonderful if you have a kiln (all of the range require kiln firing) because the clays come in a huge range of colours that give you endless design possibilities. You can also add some of the clays together (firing at the lower temperature) to give some sensational results.
So, how did I find working with the Cherry Iron powder? Firstly, at £6.99 for 50g if you mess up, it's not a huge outlay and you won't be rushing to the bank to get a second mortgage. So this is a HUGE plus for all the Goldie range of clays. On the flipside, it's a powder and I'm very lazy and really don't enjoy making clay from powder (even silver!) so I tend to put off using it just because it's easier to open a packet of ready made clay. Of course, the major advantage of powder is that you only make up what you need and the rest you store without worrying that it's going to dry out!
I've used Goldie Clay on a couple of occasions and it's amazing how different the clay powder looks and feels in the powder state and then when made up. The Cherry Iron is silky smooth - really really smooth! It's a deep red in colour and looks like a very red copper. Unlike other brands of base metal, the clay didn't stain my hands - which is a huge benefit as other clays I've used have turned my hands green - not a good look lol
What I found with the made up clay is that it has a fairly long working life without drying out which is always a plus. I think I added a tiny bit too much water at the start (despite being very conservative) because the clay was a little stretchy when rolling out but after it had dried out a litttle, there were no issues with this at all.
I wasn't sure whether using Coolslip to lubricate the leaf texture I'd made would affect the clay but it didn't seem to cause a problem at all. I know some oils can affect base metals but in this instance there were no issues. The clay takes textures REALLY well and I think if I use this again, I'll make sure I use lots of textures.
Sanding was very easy but the pieces did feel a little more brittle than I've found with silver. I did break one snake sanding so I think it does need a fairly light touch. What was really interesting was the clay in the dried state is a deep cherry red but with sanding and polishing (pre firing), it started to take on a red/gold look that was very pretty.
One thing that I found quite difficult was joining pieces. You can either use just water or make up a paste. I tried both. I found with the water only approach, the pieces really didn't want to stick. The water also stays evident for quite some time (unlike silver where you can add it and it disappears almost immediately. I persevered with just water for quite some time but it just didn't want to stick. So I made up a paste and tried that. That worked but I did have to hold the pieces together for longer than I would normally. Unfortunately, if you look at the bale just before the curve at the end, it's slightly marked instead of being smooth - this was caused by the excessive amounts of water, paste and holding together I did. This wasn't evident before firing though.
Firing is a bit of a pain - only in terms of how long you have to fire for. With most base metals, you have to do a two stage firing process and Goldie Clay is the same. The first stage is usually to place the items on a bed of carbon and fire and then the second stage the jewellery is fully covered with carbon and fired again. The first stage with Cherry Iron is 30 minutes at 400 degrees. The second stage however is 2 hours at 960. So it's not a quick process!
When I took the pieces out of the kiln they were definitely sintered. There was a nice metallic clink to the pieces. They had turned completely black - almost like they were covered in soot - but there was none of the thick look of excessive firescale that some base metals can have, this was simply a very thin coating (very similar to how silver comes out of the kiln and is white).
I decided to wire brush the leaf and pickle one of the circles to see if there was a difference. The black layer came off quite easily and revealed a gold red. A really pretty colour. The circle on the other hand literally had only been in the pickle for a few seconds and it was bright cherry red!!!! So, I decided that pickle was safe and so added all the pieces, plus the leaf, for a quick dunk!
What I then decided to do was polish the leaf. As I started to hand polish, the red disappeared and out came the gold red again! I wondered if I'd used a contaminated polishing cloth so switched to a dremel with a polishing attachment. No, it wasn't contamination - the colour of this metal when polished is a gold red. I can't really describe the colour because it's not copper or rose gold but somewhere inbetween. A really lovely colour.
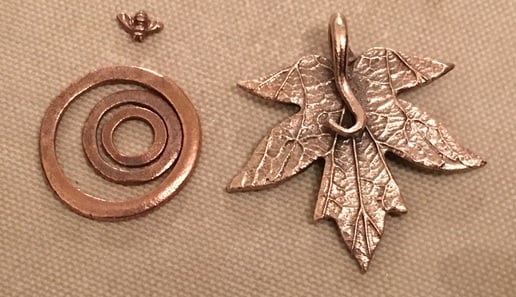
I'm not sure whether this photo really shows the difference in colour but the rings and bee are unpolished and cherry red (more red than the photo shows I think), the leaf has been polished to the gold red.

Although I sanded the leaf well before firing, I decided to do only minimal work to the rings (these were going to be my control experiment) so they are a bit rough and ready but actually I might make them into a pendant because I quite like the rustic look!
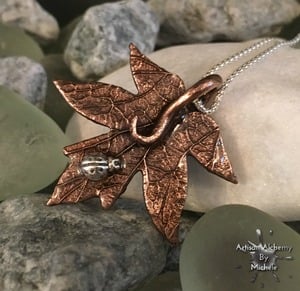
So, now for the big drawback with base metals - they can oxidise really quickly :( With iron, there's the added problem of rusting! Eeeeeek! So I spoke to Waldo (who makes Goldie Clay) to ask what he uses to protect his pieces. He suggested Protectaclear. I've got Protectaclear and it's ok. It's a liquid that you paint on, allow to dry and then repeat etc. but it doesn't last forever and does require repeat applications. The other thing is that it stinks (only when you're applying it) and can be a messy job. I much prefer Renaissance Wax as an alternative and use that as a preference. However, with iron and the added issue of possible rusting, I wanted something that might be a little more permanent. I decided to experiment and use a clear resin. I have no idea if this will work or not but it's going to be an interesting experiment! It does give a glassy/glossy/watery appearance but for the leaf design that's ok. It also darkened the finish back to the cherry red of the unpolished piece so if you prefer the gold red then don't use the resin! I'm not sure I would use it on every piece though.
So, without further ado, here's the final version with an added fine silver ladybird!

A big thank you to Waldo for answering my many questions late on a Sunday night!

Add a comment: